VSSL App Configuration

VSSL
Last Update há 3 anos
Your VSSL has been designed specifically to function flawlessly within the music streaming apps already downloaded and used on your mobile devices and tablets. We've also built a mobile app than provides a ton of different settings and features when configuring and fine-tuning your listening experience.
Setup Wizard
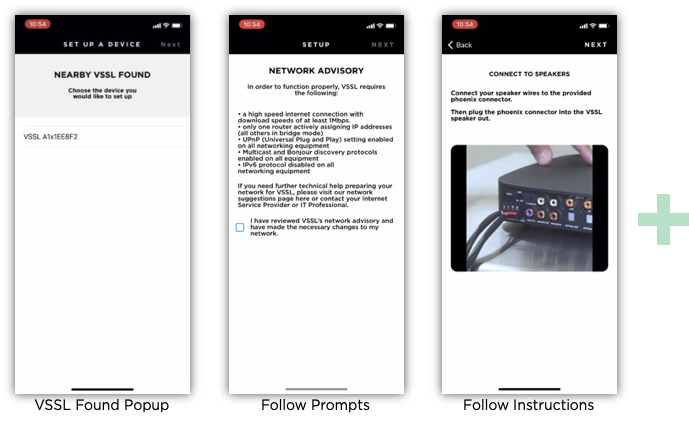
When your VSSL device is plugged into power for the very first time (or after a factory reset), the VSSL app will automatically recognize your
X Series device and initiate its setup (1st generation A Series amplifiers require setup directly through the Google Home app). Simply follow the prompts to name your zones and choose how you would like to stream to your amplifier. The app will automatically take you through the setup of your zone(s) for use with Google Cast, AirPlay 2, and/or Alexa Cast. The first few screens of the Setup Wizard are shown in the figure below.
Zones Screen (Home)
While we highly suggest utilizing your preferred music streaming app for all playback controls, we have designed the VSSL App's home screen to focus on the most necessary quick access items such as volume control, input selection, and paging capabilities.
Volume Control
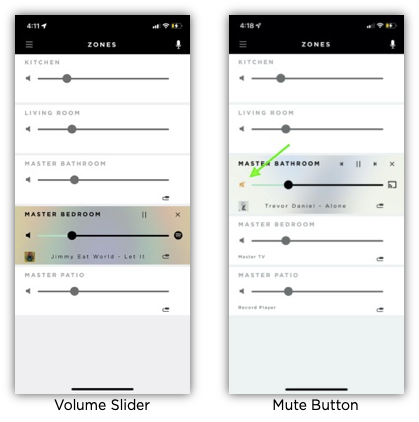
While a music stream cannot be started from the VSSL app, the volume of zones currently playing music can be adjusted instantaneously on the Zones Screen with the provided sliders. The volume of zones that are not actively playing music can be adjusted as well before a stream begins. A simple press of the small speaker image at the left side of each slider temporarily mutes the selected zone.
Playback Controls
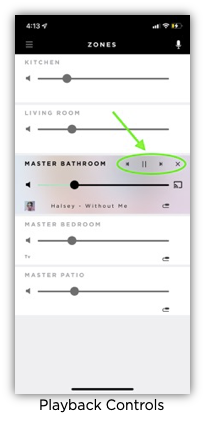
Again, while a music stream cannot be started from the VSSL app, playback controls such as play, pause, stop, next, previous, and disconnect zone entirely can be accessed in the top right corner of each zone's section (note: available controls specifically depend on which streaming protocol is being used).
Input Selection
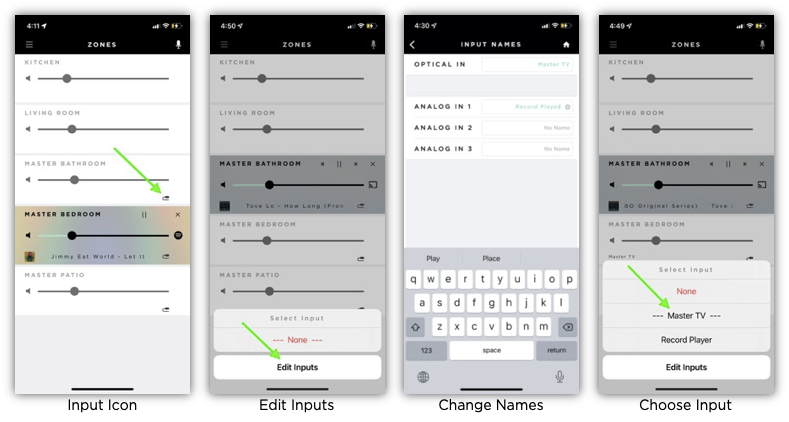
Users wanting to play external inputs through their VSSL amplifier (i.e. TV audio, record player, CD player, etc.) will need to create a name for each input source and assign it to the zone or zones of their choice. This can be done by clicking the small input icon in the bottom right corner of each zone's section -> selecting 'Edit Inputs' -> creating a name for the used input -> returning to the Zones Screen -> selecting the icon once more -> then finally selecting the input name to be assigned to that zone.
Paging
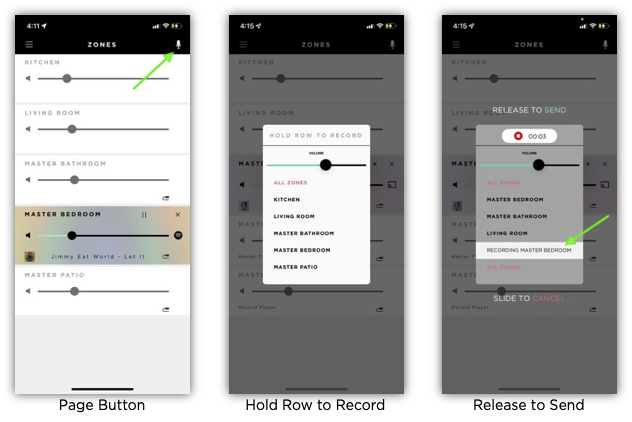
Your VSSL comes packed with the ability to utilize your home audio system as a paging/intercom system! On the Zone Screen, simply select the microphone icon at the top right corner of the screen -> adjust the paging volume if desired -> then press and hold the zone of choice while speaking into your mobile phone's microphone. Once you are done recording the audio of the message, simply let go of the selected zone and the recorded audio will play.
Menu Items
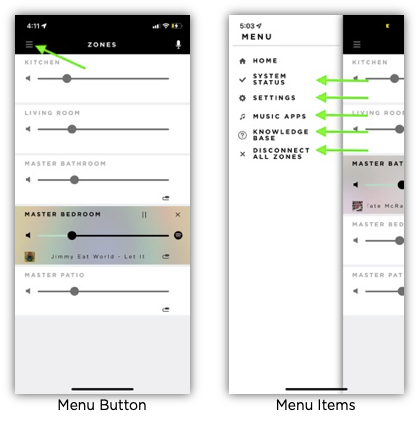
By selecting the 3-line icon at the top left corner of the Zones Screen, a menu bar becomes available. While we mostly focus on the Settings section, it's important to be aware of a couple helpful features here in the menu bar.
- The System Status section allows for a quick overview of all zones actively playing or that may be experiencing connection issues.
- The Music Apps section provides simple links to some of the most popular music stream apps, reenforcing that streaming occurs outside of the VSSL app. Note that the apps listed here are only a few examples and does not indicate the only apps we are compatible with.
- The Knowledge Base button is a link to our support page with answers to questions you may have regarding your product.
- And finally, pressing the Disconnect All Zones button is a quick way to sever all connections between streaming devices and the VSSL zones and stops all audio on your entire system.
Settings Section
Your VSSL amplifier comes packed with a ton of configuration options so that you customize your audio system to behave and sound exactly how you want it. Simply select the Settings section from the Menu bar.
System Settings
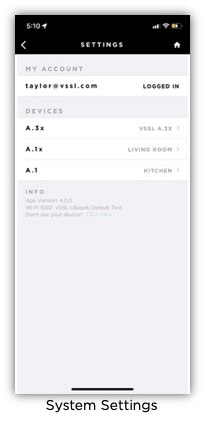
The first screen of the Settings Section provides an overview for your entire audio system. Besides a list of your available devices on the network your phone is currently connect to, this screen also provides the ability to register/login to an account (so that you may use the paging volume feature) and provides information regarding the app version and Wi-Fi SSID your mobile device is currently utilizing.
Device Settings - Overview
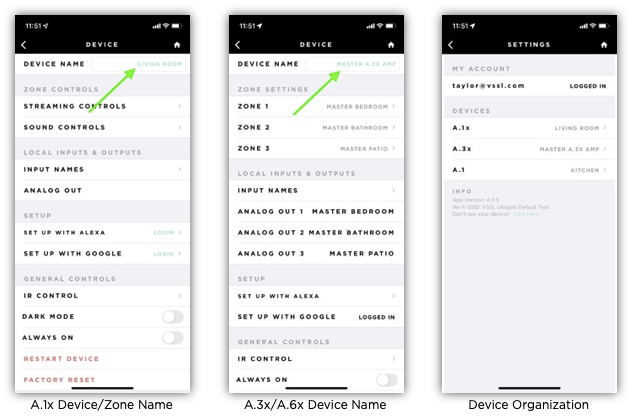
From the System Settings screen, select the amplifier that you would like to configure and customize. The options on this screen include the global device settings that may be changed for the entire multi-zone amplifier (A.3x and A.6x). For A.1x amps, the device and zone settings are one and the same with only a single zone of audio.
Device Settings - Device Name
The first option on the Device Settings screen allows you to customize the name of the amplifier. For the A.3x/A.6x, this provided name is only utilized internally within the app and mainly for being able to distinguish between multiple amplifiers on a single network on the previous System Settings screen. For the A.1x, this is the name that is utilized for both the System Settings screen and the zone name which will display within your music streaming app. To change this name, simply click into the text box, delete the previous name, type a new name, and select return or click out of the text box.
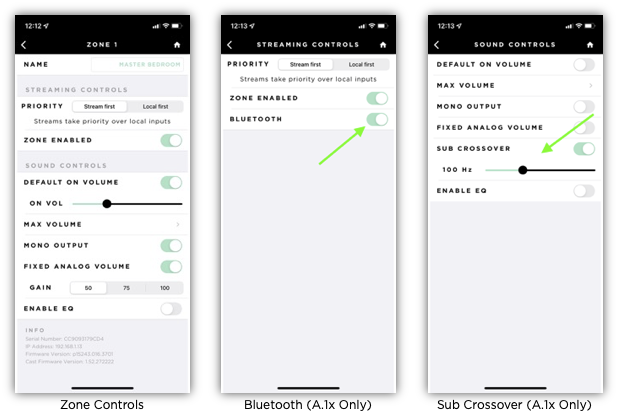
Device Settings - Zone Controls
- Priority - By default, the VSSL sets priority to “Streaming first” if you are attempting to simultaneously stream music AND play a physical input to a zone. For scenarios where you desire to have the local input take priority over a stream, toggle the zone’s priority setting to “Local first.” This is especially helpful in cases where speakers are being used for both TV watching and listening to distributed audio.
- Zone Enabled - If you are not using one of the zones on your A.3x or A.6x, you may completely disable the zone until you are ready to use it. Note that the zone still needs to be set up before disabling it within the app. We suggest naming the zone "Unused", "N/A", or simply adding a period. We are still working through a bug with Apple where the zone still appears in the AirPlay 2 menu.
- Bluetooth (A.1x only) - While we highly suggest utilizing the Wi-Fi audio functionality of your A.1x, bluetooth connection is also available. If you are concerned with strangers gaining access to your system, simply disable the bluetooth signal.
- Default On Volume - Use this feature to set a default volume level each time your zone plays anew. Select the toggle to the ON position and adjust the volume slider to enable it.
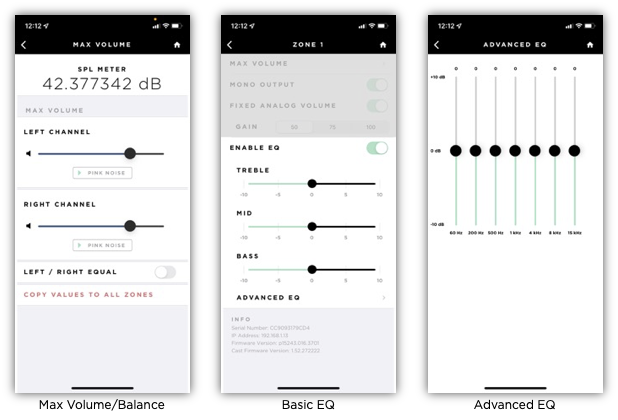
- Max Volume/Balance - In order to protect your speakers from being damaged due to excess volume, you may want to limit the audio output of a specific zone or even all zones. Adjust the slider to the desired percentage of the zone's maximum volume output. For an even more fine-tuned listening experience, if you have allowed your VSSL app microphone access, your mobile device acts as an SPL meter and measures the active dB level being heard. We've included a helpful pink noise audio file as well that can be played for an accurate noise reading. If you're happy with your maximum volume levels for this specific zone and you can quickly copy those percentage values to all zones on the selected multi-zone amplifier with the provided button. The max volume levels can also be used to fine tune balance.
- Mono Output - By enabling this feature, the left and right channels will reproduce the same single, monophonic signal. To remain in stereo with two individual left and right signals, disable the feature.
- Fixed Analog Volume (Physical Inputs) - When hardwiring another source as an input, volume control can be confusing since both the VSSL and input source could have their own separate controls. Enabling this setting fixes the VSSL's volume to the selected gain value of 50, 75, or 100% while the input source is active - volume levels can then be managed exclusively through the input source. Note: this fixed volume setting does not pertain to streams.
- Sub Crossover (A.1x only) - Enabling this feature allows for crossover control between 50 and 200 Hz on the dedicated Sub Out connection only.
- EQ Settings - You can fine tune any of your zones to improve & tailor your listening experience. Simply toggle on “Enable EQ” and adjust the basic treble, mid, and bass preset sliders. Finer frequency range adjustments can be made under “Advanced EQ.”
Device Settings - Local Inputs & Outputs
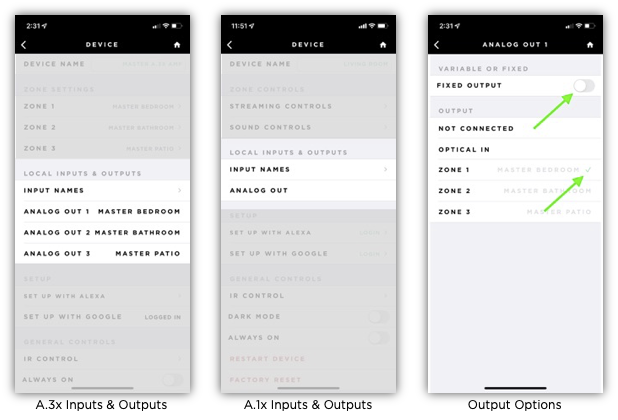
- Input Names - Users wanting to play external inputs through their VSSL amplifier (i.e. TV audio, record player, CD player, etc.) will need to create a name for each input source and assign it to the zone or zones of their choice. The editing of the name occurs here while the zones are assigned from the Zones Home Screen. Each optical and analog input connection is matrixable to any of the zones on the amplifier.
- Analog Out - You can also connect your VSSL to any external system you like and provide a line level signal (e.g., home theater receiver, high-powered amplifier, outdoor audio system, subwoofer). The VSSL is capable of acting as the audio source in these systems. Once you've made the physical connection to one of the pre-outs, take note of which connector is being used and assign whichever of the 3 zones that will supply the line-level signal to the specified output. All outputs are matrixable to play with any of the zones on the amplifier. The output by default is variable, which allows you to control the volume of the external system from your streaming device or VSSL app. If you would prefer to control the volume through the external system's controls, simply enable the 'Fixed Output' toggle switch.
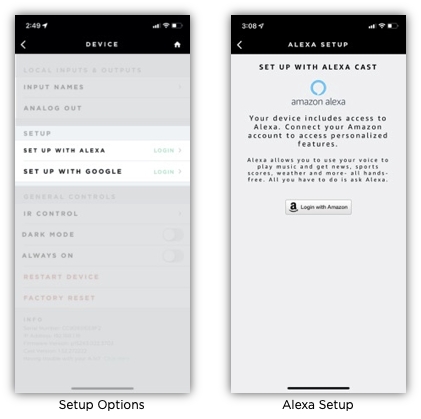
Device Settings - Setup (Alexa and Google)
While setup can be done utilizing the automatic Setup Wizard popup, you can go back and access all setup options even after initial setup through this menu. The 'Set Up with Google' button simply redirects you to the Google Home app for setup there, or indicates that setup has already been completed. The first part of setting up, or "registering", your zone(s) with Alexa occurs within the VSSL app. On the Alexa Setup screen, click the "Login with Amazon" button -> click 'Sign In to Amazon' -> input your Amazon account credentials -> and click 'Allow' for AVS Services and Alexa Account Connection. For the A.3x and A.6x you will need to setup each of your 3 or 6 zones this way. Click here for more detailed Alexa setup instructions.
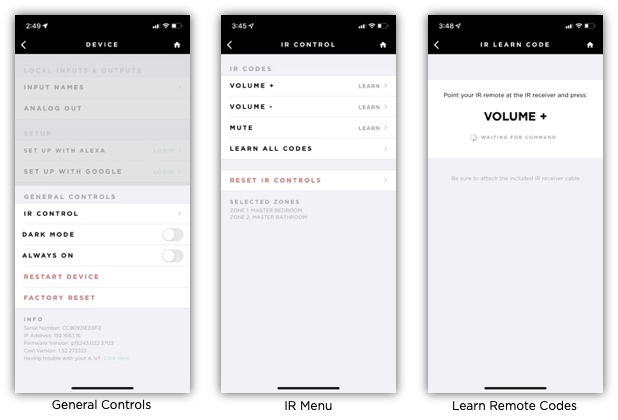
Device Settings - General Controls
- IR Control - Your X Series amplifier can learn IR codes to control your TV’s or control system’s volume with its original remote. Connect the included IR cable to the IR Remote port on the back panel of your VSSL. In the VSSL app zone settings with the remote in hand, select the 'IR Control' button -> select the zone(s) you would like to control with your remote (A.3x and A.6x only) -> select 'Learn All Codes' -> and follow the prompts on the screen to learn the IR codes for Volume+, Volume-, and Mute functions. The device status indicator will blink purple when it receives a learned command. Select 'Reset IR Controls' if you'd like to start over.
- Dark Mode (A.1x only) - Enabling dark mode turns off all zone and power indicators on the VSSL. Only after disabling Dark Mode or factory resetting the device will the indicator lights turn back on. This is especially helpful in locations where the light can be distracting or too bright.
- Always On - This mode allows the device to remain on at all times. This setting is typically helpful in situations with an added control system to help with quicker network control commands. By default, the VSSL is set to Auto Mode and automatically enters into a network standby mode after 10 minutes of no music output. When set to Auto Mode, the VSSL utilizes less energy when not active. To wake the VSSL, simply start a music stream to the device. Note that this setting is available only for the A.1x and A.3x within the app while the A.6x includes a physical switch on the back of the unit with the same functionality.
- Restart Device - Reboots are sometimes necessary when having network or connection issues. A reboot can be completed through the app or by toggling the power switch on the back of the A.3x and A.6x.
- Factory Reset - When a VSSL device is being moved to a different location or if any changes need to be made to the network/networking equipment, a factory reset is absolutely necessary beforehand. A factory reset removes all previous configuration and registration with Google, Apple, and Amazon and all zones will need to be reconfigured again. A factory reset can also be completed by holding the 'Reset' button for 10-15 seconds on the back panel of each device.